For a lot of gamers, buying a prebuilt gaming PC is the easiest and best way to join the world of high-performance play. It’s totally fine to go with the ready-to-play-setup, but building your own gaming PC is a whole other kind of satisfaction.
A self-made PC grants you the freedom to express yourself through gaming. Do you need raw power to deliver triple-A titles in 4K? Looking for a powerful e-sports machine to simply dominate the competition at lightening speeds while delivering a super smooth experience during game play?
Or maybe you seek a hybrid rig that can play games, stream and create content in one. Whatever you’re aiming for, a custom system allows you to take control of everything.
Why It Is Worthwhile to Build Your Own PC
Assembling your own computer enhances autonomy, mastery, and returns on investment. Individual components can be upgraded, more powerful components can be incorporated as gaming needs increase, and the restrictions that come with pre-built systems can be avoided.
A Reflection of Your Gaming Spirit
A custom computer will be the digital hub of your gaming, artistic activities, and achievements. The sense of satisfaction that you will feel when the computer is powered on after you completed the assembly and installation of the components will be priceless and far surpass that of a pre-built system.
How This Guide Can Help
We will look into a wide range of tools and components in this interesting article, including computer cases, a step-by-step guide on the assembly of the computer. The initial boot, the first time you set the BIOS, the installation of the operating system, and adjustments on performance. Everything will be explained in a manner that a complete novice will be able to understand, in case he wants to go with the custom pc rather than investing in pre-built deals. So, without further ado, let’s get started!
Choosing the Right Components for Your Gaming PC
Building a gaming computer involves a lot of planning and thoughtful consideration of which parts to use and how those parts will work together. There are CPUs and GPUs to think about and you have to weigh how buying each component will affect the speed, stability, and overall efficiency of the computer.
There are some components whose relation to one another can create what gamers call a ‘bottleneck’ which is when a component is significantly weaker than the rest. Above all, you can shop all these parts individually or in groups at the gaming powerhouse Zestro.
The following is a description of how to complete this process in a logical manner.
- PC Case: Space, Airflow, and Future Upgrades
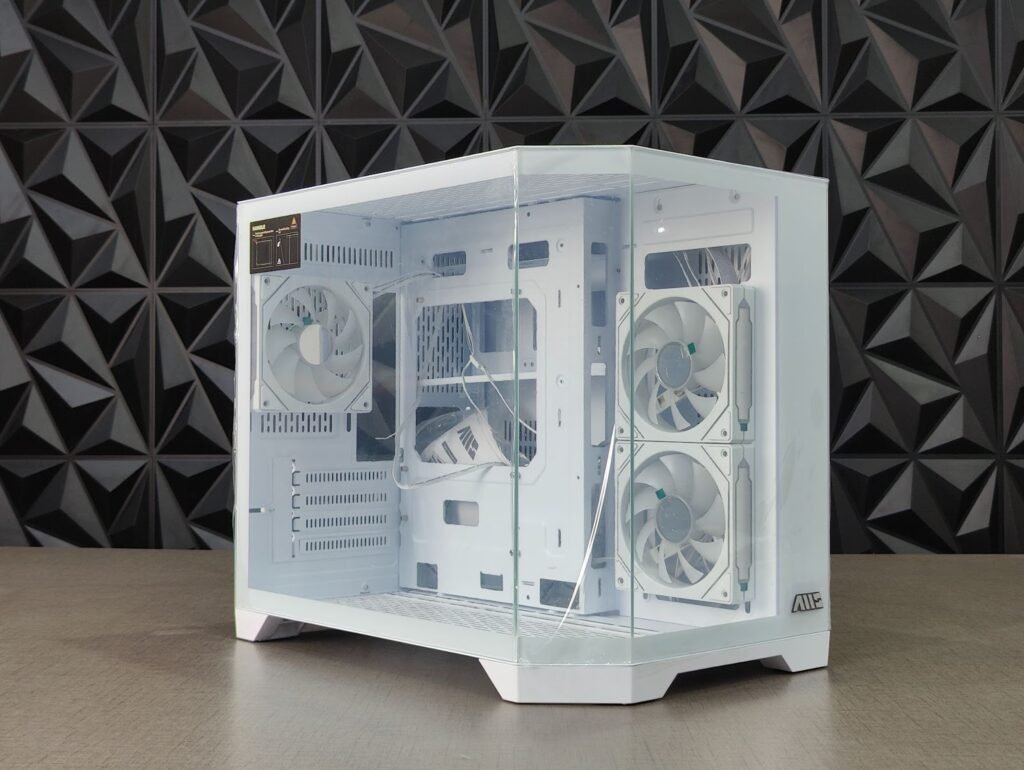
The PC case is a vital component since it will house and protect every other part. Without appropriate space, one will not be able to install all the other components. Every part will have a different size and some high-performing graphics cards are very long and tall.
The more efficient the airflow of the case is, the cooler the parts will stay which can increase overall performance. The case will also have a big impact on the ease of use and the overall cleanliness of the cable management. Lastly, one should also consider the sustainable usage of the case. An optimum case will allow future upgrades to be installed.
Different Case Sizes
- Full Tower
- Best ventilation, most space.
- Supports large motherboards (E-ATX) and big GPUs.
- Ideal for custom water cooling or heavy future upgrades.
- Mid Tower (Most Popular)
- Fits ATX, Micro-ATX motherboards.
- Plenty of airflow and expansion options.
- Great balance for most gamers.
- Micro-ATX Case
- Compact, affordable, fewer expansion slots.
- Still powerful if airflow is good.
- Mini-ITX Case
- Very small, portable, stylish.
- Harder to build in, limited cooling and expansion.
Just ensure that you go with a proper case as it improves airflow, keeps temperatures low, reduces noise, supports big GPUs, and makes cable management much easier.
- Processor (CPU): Your System’s Brain
The CPU, or the processor, is a very significant part of the computer. It is in charge of all the background processes and makes everything function. The designed usage of the computer will also be influenced by the CPU. More cores added to the CPU makes it better and more efficient. Modern, more complicated games and programs will require a CPU with more cores, especially when running multiple tasks simultaneously.
The CPU socket will need to be compatible with multiple different CPUs in case you want to upgrade to a better one in the future. The CPU should be kept balanced with the rest of the components so that the graphics card can perform to its fullest.
Intel vs. AMD and What to Choose
The CPU determines system responsiveness, multitasking capabilities, and performance in certain games or creative workloads.
Intel CPUs
- Intel processors are best for high FPS gaming, especially in esports titles.
- Strong single-core performance.
- Integrated graphics on most models.
- Excellent power efficiency on newer generations.
- Great option if you want plug-and-play performance.
AMD Ryzen CPUs
- AMD Ryzen processors are best for multitasking, streaming, and content creation.
- Higher core counts at similar price points.
- Very strong in productivity workloads.
- Modern Ryzen CPUs provide excellent gaming performance.
- Often better long-term upgrade paths due to socket stability.
- CPU Cooler: Keeping Temperatures Under Control
Keeping the CPU cool enables the processor to run at its fastest and safest capacity. AIO liquid coolers offer lower temps and quieter performance, but require planning around case spacing. Thermal throttling is prevented and fps stays consistent, as cooling improves overall performance as the CPU lifespan is extended. Choose a cooler that fits the case, and matches the power requirements of your CPU.
- Motherboard: Compatibility and Features
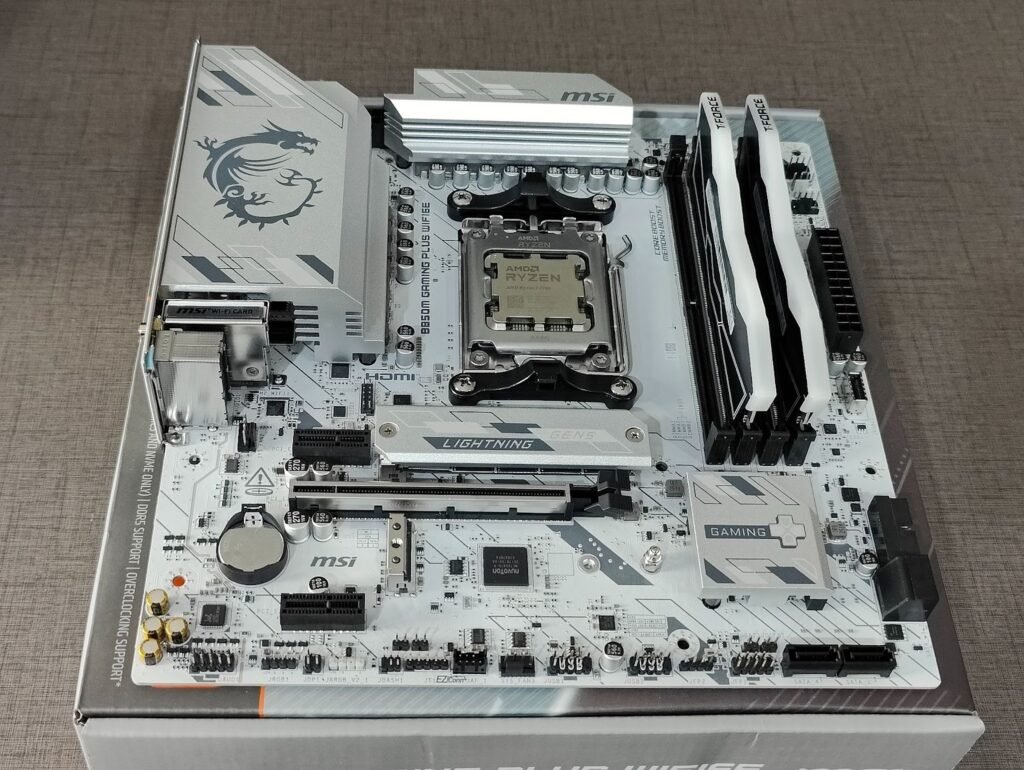
Determining the parts you can install is the motherboard’s most important function. Choose a motherboard that features the correct socket for your CPU, and a sufficient quality of VRM to deliver power stably, at the ATX, mATX, or ITX size that fits your case. There should be enough fan headers, USB ports, and RAM support as well. A motherboard can’t increase fps, but a quality motherboard makes builds smoother and more stable, and makes upgrades easier down the road.
- RAM: Smooth Gameplay, and better Multitasking

Improved loading times, and stutter reduction, smoother multitasking, and overall improved RAM performance.
In gaming today, 16 GB is the absolute minimum. 32 GB will deliver improved performance on more recent AAA titles and even some games planned for future release. Faster MHz speeds are beneficial as well, for both AMD and Intel processors. For better bandwidth, always go dual-channel (two sticks). If you are anticipating heavy multitasking in the future, try to buy RAM that is more than you will likely need for a task, as it is better to have headroom to upgrade.
- Storage: Faster Loads and a Snappy System

Your drive controls how quickly games boot and how fast your system feels.
NVMe SSDs are the fastest and best for both your operating system and your favorite games, while SATA SSDs are cheaper and certainly good enough for most titles. Hard drives, while slow, provide large amounts of space to store big game libraries.
A good balance is one fast NVMe for your boot drive, plus a second storage drive with either an SSD or SATA HDD. In the end, the faster your storage, the less waiting you will do and the more playing you will get to do!
Types of Storage and What They’re Best For
Storage affects boot speed, game loading times, responsiveness, and overall smoothness.
- NVMe SSD (M.2)
- Fastest consumer storage available.
- Reads/writes drastically faster than SATA.
- Perfect for OS, frequently played games, creative work.
- SATA SSD
- Still very fast and reliable.
- Cheaper than NVMe.
- Ideal for game libraries, applications, general use.
- HDD (Hard Disk Drive)
- Much slower, mechanical.
- Best for mass storage (videos, backups, large files).
- Not recommended for games or OS if speed matters.
- GPU: The Heart of Gaming Performance
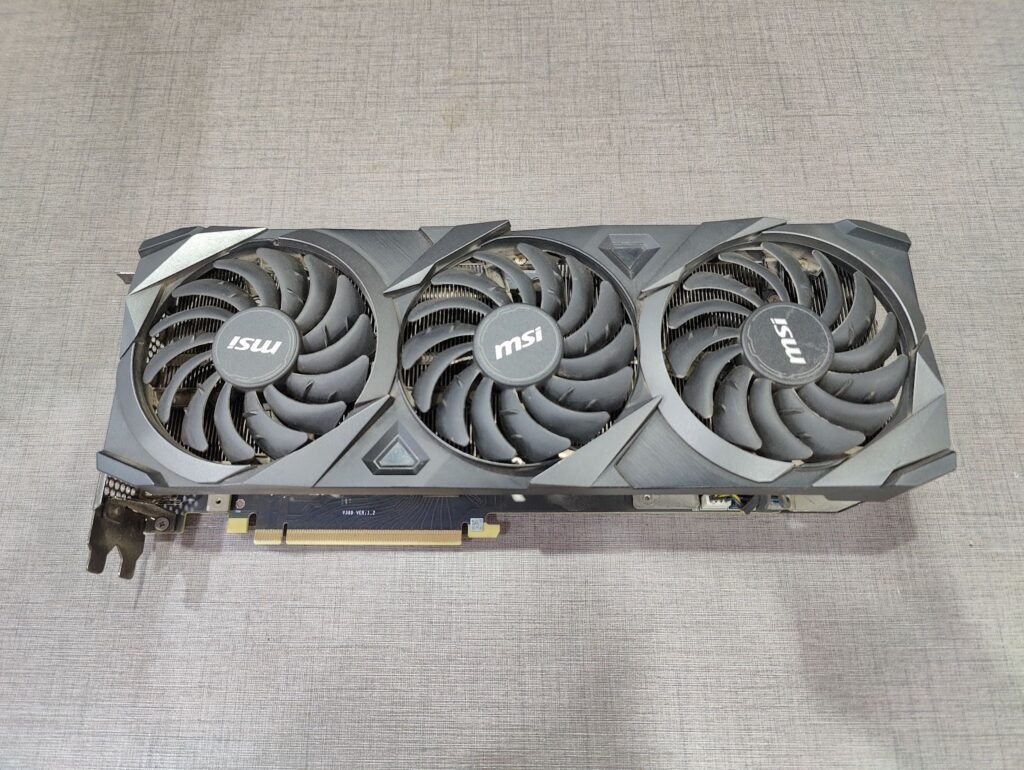
Your graphics card will always have a bigger impact on your frames per second (FPS) performance than the rest of your computer.
To determine the GPU of preference, base it on the resolution. For 1080p, less power is required, whereas 1440p demands mid to high power, while 4K requires top end performance. Check the amount of required VRAM for the games to be played.
Triple-fan cards are preferable as they are more cooling efficient and operate more quietly. Other features like ray tracing and upscaling can be considered to improve the overall performance and graphics of the games. Be it the Nvidia GPU or any other you are using, ensure that it is balanced with the CPU to prevent bottlenecking the performance of each other.
A quality Power Supply Unit protects the components of your systems and gives the entire system reliability. Always select a PSU with enough power for your CPU, and GPU, but be sure to leave enough room for future upgrades.
Preparing Your Tools and Workspace
The first priority is not to open any boxes, or start tearing into components. Let’s set up a work space that will allow for organized, safe and efficient building. A powerful gaming pc contains delicate electronics, tiny screws and several steps that need some elbow room. It’s just the right preparation isn’t optional, it is the build and a good way to avoid mistakes.
Choose an Appropriate Work Area
Choose a sturdy, level surface with enough space to accommodate the PC case, the motherboard’s component boxes and other packaging. A solid table as a dining table, workbench or large desk works well. Avoid placing the structure on carpet (not recommended anyway due to added static charge risk) also. If all you have is a carpeted room, try to find a piece of cardboard or board that is larger than the area under your feet while knitting.
A comfortable workspace should include:
- Sufficient light to see screw holes, plugs and labelling on the motherboard.
- A dust-free clean surface to prevent dirt from becoming mixed on to the parts
- Convenient spots for testing components later on near electrical outlets
- Ample space to spread out type without stacking it.
- Get rid of drinks, food or anything that might spill. liquids and electronics don’t get along.
Properly Manage Electrostatic Discharge (ESD)
It’s rare, but a single static shock can destroy an entire CPU, motherboard or RAM stick instantaneously and silently. Fortunately, ESD is easy to avoid with a little forethought:
- Whatever you do, don’t keep your feet moving and work.
- Touch the metal part of the case from time to ground yourself
- Work on non static surface like wood or metal tables
To keep your parts in perfect condition, leave them inside of their antistatic bags until you’re ready to use them.
Optional tools, including an antistatic wrist strap which costs just a few rupees, can be a little peace of mind and you can’t beat the price.
Gather the Essential Tools
You need only a handful of tools to build a new PC, but the right ones make the task cooler and more efficient.
Phillips Screwdrivers
You will use a Phillips #2 screw driver for almost every component installation. For particular M.2 SSDs, a Phillips #0 screwdriver may need to be used for some of the smaller screws. Magnetic-tipped drivers are quite helpful as they will hold screws in place, making it far less likely that one will fall inside the case while working.
USB flash drive (8 GB or larger)
This will be useful later for holding your operating system installer. If you have the USB ready in advance, you can go right from assembly to OS install without waiting.
Small Container for Screws
Each part comes with its own screw pack, and losing a single screw can really put a dent on the build. A cup, tray or magnetic parts dish allows you to easily keep track of everything.
Optional Tools
- Cable ties for neater cable routing
- Wire cutters or snips: A flush cutter or scissors will be necessary to trim the excess cable tie material.
- A flashlight or headlamp to work inside the tight case cavities
- Decent Gaming Headphones to have more fun while playing
Organize Components Before You Begin
Unpack All Boxes and check whether you have received all ordered goods. This also prevents any surprises in the middle of the build. Then, do not separate smaller parts like RAM, SSDs, and mounting hardware to prevent confusion.
If you’ve got any hardware included, such as screws, drive sleds or removable brackets, have them at the ready. Most come with a little bag of mixed screws, sometimes sorted by type but not always. Pre sorting them means you’re good to go when it’s time to mount the motherboard and PSU.
Final Workspace Checklist
So before we proceed let us confirm:
- You have your Phillips screwdrivers handy.
- The USB installer is prepared or you want to create it in the near future
- The work area is spacious, well lit, and ESD safe.
- All component boxes are filled but tidy
- It can be fully opened while cased or free standing.
Now that you have everything set up, it’s time to get your hands dirty with the more practical parts of the build.
Step-by-Step Assembly: Bringing Your PC to Life
After you have all of your parts ready and your workspace prepped, the fun starts: putting together your gaming PC. This phase makes a table full of parts into a beast that’s ready to tackle your favorite games. No matter whether this is your first time building or you’re back after a long absence, the following steps should guide you through every crucial installation with clarity and confidence.
Step 1: Set Up and Inspect Your Motherboard

Before you begin, you want to take your motherboard out of its antistatic packaging, and lay it on a clean flat dry non-conductive surface before you start fiddling around with any parts. The motherboard is the central platform on which everything else is attached, so don’t be in a hurry here.
Checklist before installing components:
- Make sure the PCU socket cover is in place
- Find the RAM slots (these are almost always situated next to the CPU socket)
- Pick out the M.2 slots for SSDs
- Get to know the 24-pin and 8-pin power plugs
- Getting oriented now will help keep the rest of the assembly humming along.
Step 2: Install the RAM: The Easy Part That Is Also Critical

No other component of a build is simpler than adding RAM, but functionality is based on proper alignment. Correct configuration is needed for improved memory performance, increased multitasking abilities, and for a more stable system.
Finding the Correct RAM Slots
Prior to installation, consult the motherboard manual. RAM slots typically follow a color-coded scheme. Depending on how many sticks and slots you’re working with, you should follow the indicated configuration:
Motherboard with 2 RAM Slots:
Take each stick, and place one in slot 2 and the other in slot 1. (Both slots will usually be marked). If you want to utilize dual-channel support, you should populate each slot.
Motherboard with 4 RAM Slots:
In dual-channel mode, you need to skip a slot.
2 sticks: Slots 4 and 2 are usually meant to be placed with sticks (2 is the second slot, and 4 is the fourth slot, with the CPU in front of you).
4 sticks: For optimum performance, utilize all four slots. This will allow for maximized RAM and bandwidth.
The proper configuration will allow for dual-channel operation, which improves overall multitasking and gaming performance by doubling the memory bandwidth.
Open the RAM Slot Clips
Moving the RAM slot to the outside of the slot should release the clips.
In their finished configuration, these clips will ensure the RAM is snug into their installed positions.
Insert the RAM Stick
There will be a notch on the stick, which will need to be lined up with a ridge you can find in each slot. The RAM has a directional component, so it should only be possible to insert the RAM one way.
Press down firmly and evenly on both ends of the stick until you hear an audible click.
You will hear the clips automatically reverting and securing the RAM.
Repeat for Additional Sticks
If there are more sticks available, repeat the process with the recommended slot configuration for each.
All sticks must be seated evenly. Otherwise, the system may fail to boot properly or run in single-channel mode.
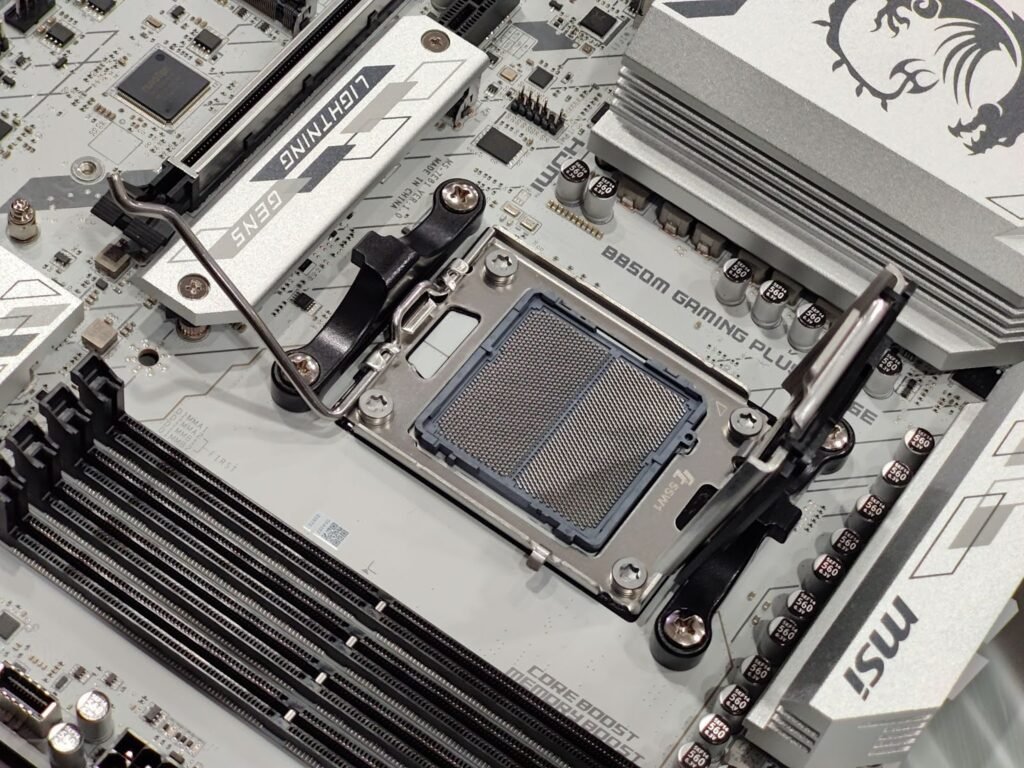
Step 3: Put in the CPU: Precision Over Force

Intel CPUs: Installation Guidance
Opening the Socket:
Identify the CPU socket on the motherboard. A small metal lever should be visible on the side.
Gently push down on this lever, and slide it to the side to lift the socket cover.
Handle the CPU with Care:
Always hold the CPU by the edges and do not touch the bottom pads and top with your fingers. Oils, dust, and dirt will affect contact and performance.
Align the CPU:
Look for the small golden triangle on one CPU corner.
Align it with the triangle or arrow on the motherboard socket.
Position the CPU:
Gently drop the CPU into the socket. It should not need to be forcefully inserted. If it does, remove and realign.
Securing the CPU:
Push the retention arm down into position. There should be some resistance, however, the CPU should not shift underneath.
Note: Intel CPUs use LGA sockets, this means the pins are on the motherboard and not the CPU. Do not touch or lift the socket pins, they are fragile.
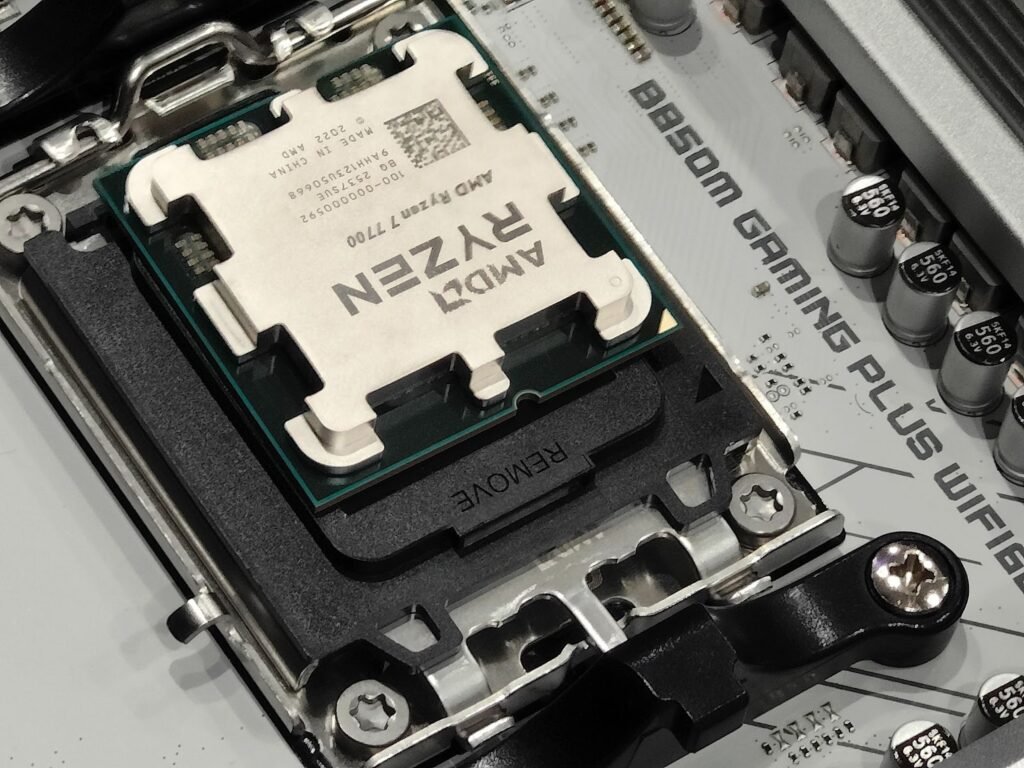
The AMD Ryzen CPUs: Installation Guidance
Opening the Socket:
Identify where the socket lever is located on your motherboard, and pull it down to lift the CPU tray.
Handle the CPU Carefully:
When handling the CPU, you need to hold it from its edges. Try to avoid touching the bottom pins, as they can be quite delicate and bend easily.
Align the CPU:
Search for a golden triangle on one of the CPU corners.
Match this to the triangle on the socket. AMD CPUs use PGA sockets, meaning that the pins are on the CPU.
Place the CPU:
Gently put the CPU down into the socket, as it should drop into position. If it does not, do not force it.
Secure the CPU:
You should move the retention arm back down, as this will lock the CPU in place. Make sure the CPU is flat in the socket.
Tip: AMD Ryzen processors have more pins than Intel, so you should keep this alignment in mind. If a pin is bent, it could cause the system not to POST as well as potentially damage the CPU.
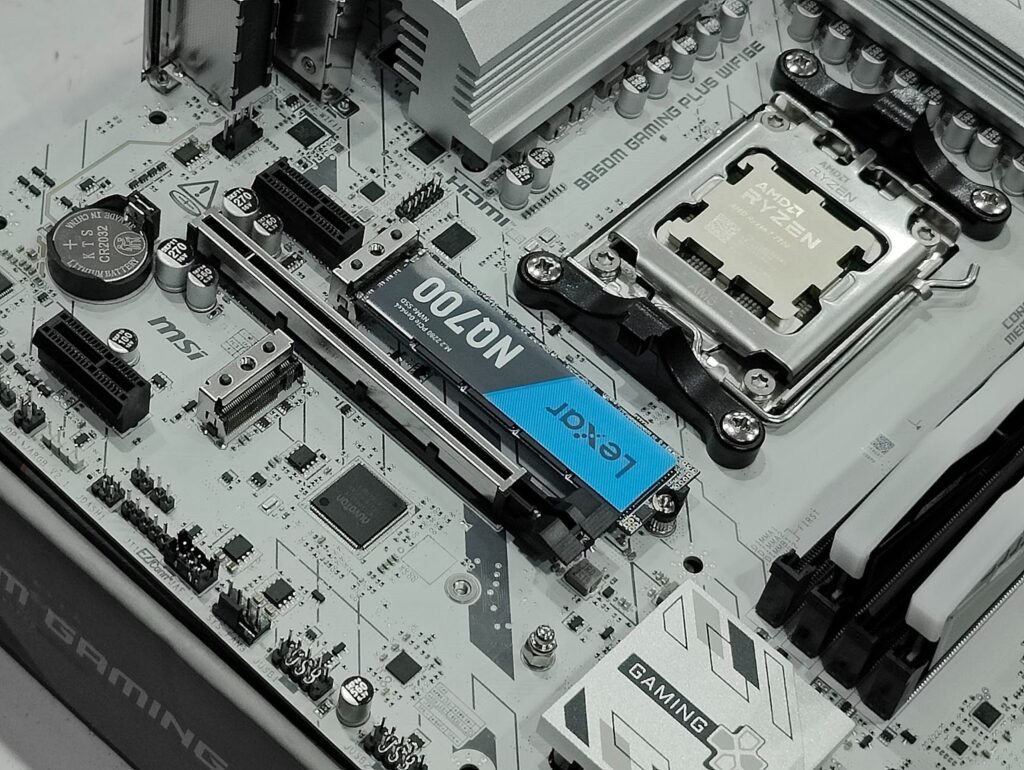
Step 4: Add M.2 SSD Storage (Optional but Highly Recommended)

NVMe M.2 SSDs are blazingly quick and should be installed before the motherboard goes into the case.
Locate the M.2 Slot
Every Motherboard has at least one, they are usually near the PCIe slots or chipset heatsink. A few have little couplers with removable tiny heatsinks: take them off.
Insert the SSD
Unscrew the tiny mounting screw.
Insert the SSD into the slot at a low angle (approximately 30°–35°). That’s it. When it’s seated correctly you’ll feel a gentle click.
Secure the SSD
Push the drive in until it is flush, then put back in the screw.
Use the heat sink on your motherboard to dissipate the processor’s heat.
That’s all there is to it, your high-speed storage is installed.
Step 5: Install Your CPU Cooler, Air or Liquid
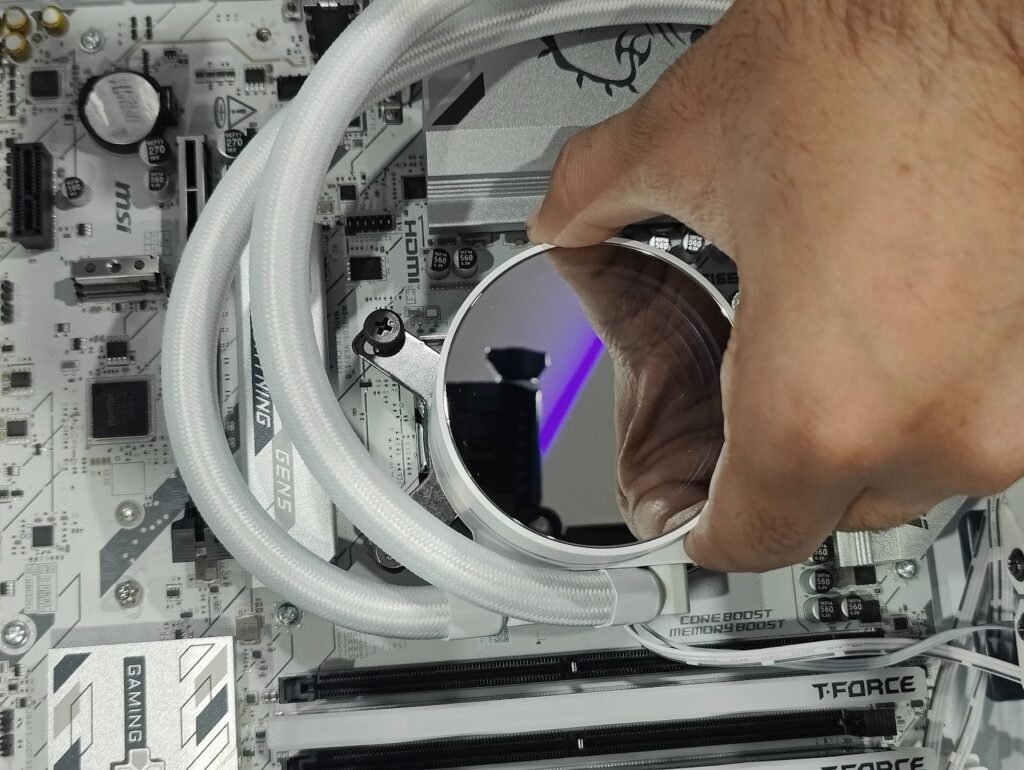
Performance and longevity are high if it’s cooled well. Specific directions vary by the type of cooler that you have, but common steps can be found below.
Confirm Backplate Requirements
Some coolers rely on the motherboard’s integrated backplate. Others want to change it or modify it. As the motherboard is still out of the case, it would be ideal to put on your backplates or switch them over now.
Apply Thermal Paste (If Needed)
A lot of coolers come with pre-applied paste. If not:
- Place a pea sized dot in the middle of the CPU
- Do not spread it manually
- The cooler pressure will spread it evenly
Mount the Cooler
Position the cooler and align it with the mounting brackets on the CPU.
To prevent uneven pressure, tighten the screws in an X pattern (upper left > lower right > upper right > lower left)slightly at a time.
Connect the Cooler to Power
Air coolers: Connect the fan cable to CPU fan connector on motherboard.
Liquid cooling pumps: Connect pump to AIO PUMP or Water PUMP FAN1 headers.
Your CPU Cooler is now mounted in place.
Step 6: Put the Power Supply in Place in Your Case
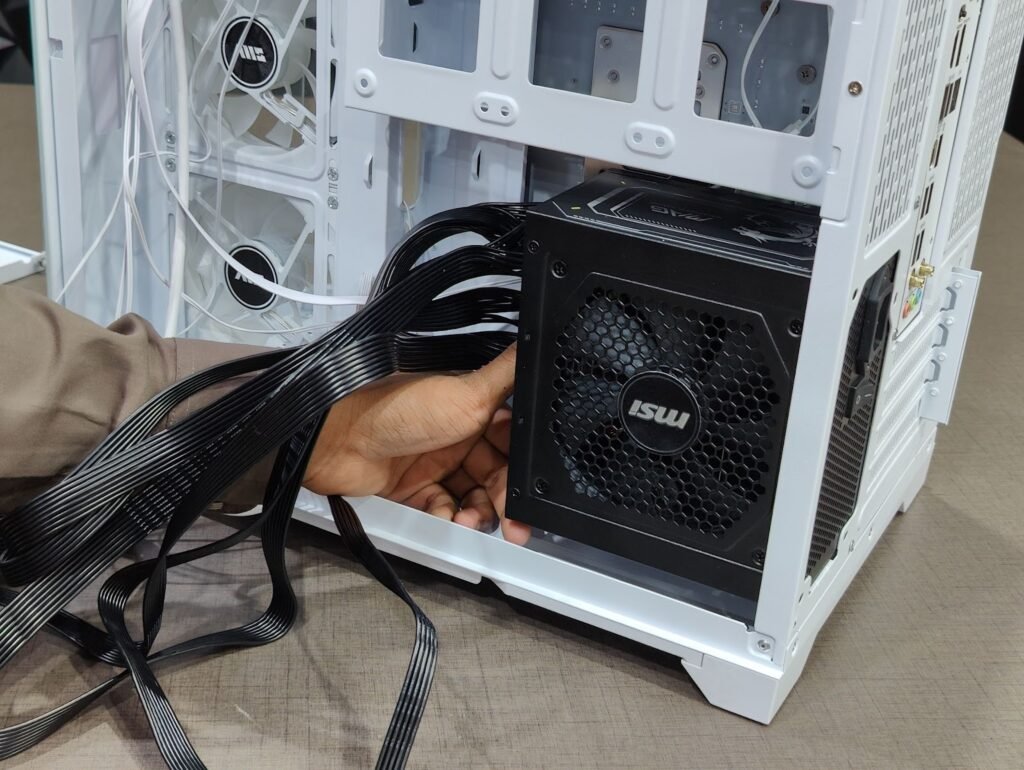
Your PC’s PSU (power supply unit) has one job: to breathe life into your hardware. A good install can help with power delivery stability and cable management (which can in turn effect performance and airflow).
Position the PSU

Today’s computer cases have the PSU mounted in the bottom of the case.
If the chassis features a vent on bottom, then install the PSU fan side down to intake cool air.
If there’s no vent, orient the PSU fan-up to help circulate air inside the case.
Once you’ve got the PSU in there, go ahead and slip it into its place and line up the screw holes with the case’s mounting locations.
Secure the PSU
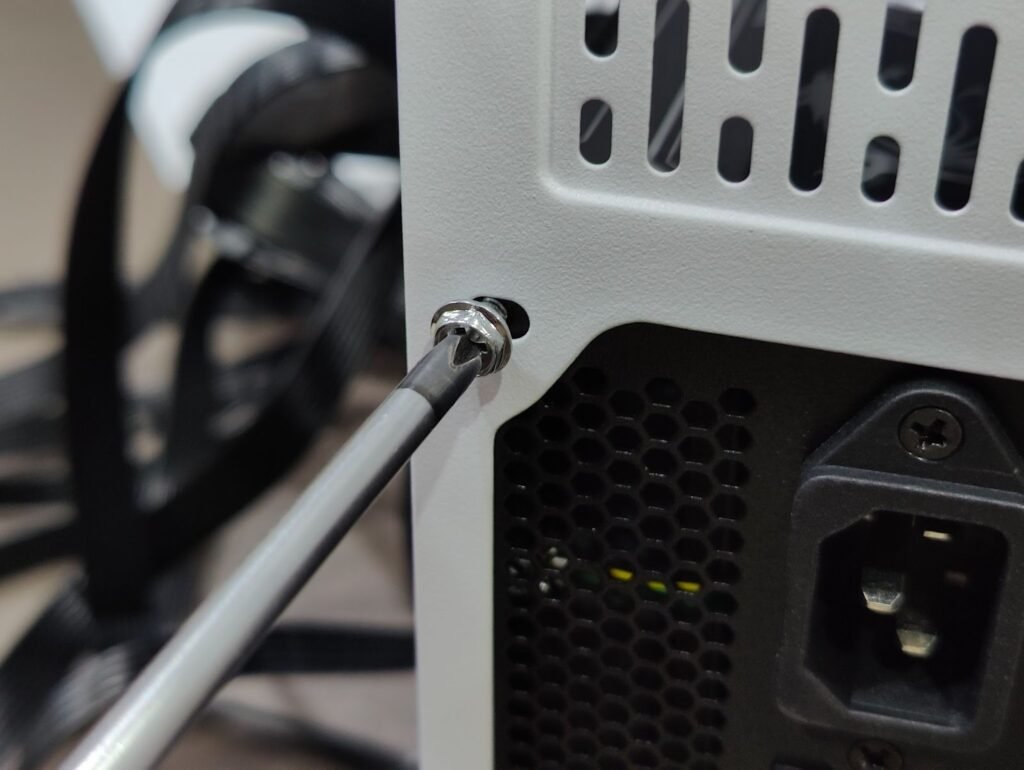
Secure it with screws from your PSU to the case.
Ensure it makes good contact and sits flat without wobbling and you won’t get any resonating noise from the PSU.
Know Your PSUs and Cable Management
For the record PSUs have vary in terms of how they’re wired:
Non-Modular PSU
- All cables are permanently attached.
- You need to route and conceal all cables (including those you’re not using), which can complicate cable management.
- Map out your cable routing in order to not obstruct airflow.
Semi-Modular PSU
- Crucial cables are hardwired (think 24-pin motherboard and 8-pin CPU).
- More cables (PCIe, SATA, Molex) are available and can be connected on demand.
- Enables more efficient airflow and easier cable management than non-modular.
Fully Modular PSU
- All cables are detachable.
- You only need to insert cables which you need that clean the interior and optimise air flow.
- Great for clean builds and easy upgrades.
- Route the Cables Properly
Regardless of PSU type:
24-pin motherboard cable: Attach it to the main power port on the motherboard.
8-pin CPU cable: Connect to the CPU power socket near the top of the motherboard.
PCIe GPU cables: Only use if your GPU needs extra power.
SATA/Molex: For storage and also fans if you need it.
Step 7: Place the Motherboard in the Case
The motherboard is a delicate step because it brings everything together. You may also want to check alignment as you go and never force anything.
Install the I/O Shield
If your motherboard is without a built in I/O shield, then snap the metal shield into either the top or bottom insert on the case.
Press down firmly around the edges; it can be a bit sharp so keep an eye on your fingers.
Check that all the ports line up exactly.
Start with the Standoffs
Standoffs: The brass or metal spacers located inside the case and into which the motherboard screws. They are used to stop the board from coming into contact with the metal chassis and shorting.
If your motherboard layout doesn’t line up with the standoffs:
Take off any standoffs that are unnecessary due to not having a hole in your motherboard. Extra standoffs can lead to short circuits.
Install the missing standoffs where ever mounting holes are in the motherboard. Utilize the standoff tool (a chunk of which motherboard manufacturers often include with your case) or pliers.
Make sure every hole has a stand off and there is not a stand off under an open area.
This step is critical. If standoff position is incorrect it can cause severe damage to the motherboard.
Align and Place the Motherboard
Gently lower the motherboard into the case.
While doing this and being careful not to damage the rear ports through the I/O shield cutouts, maneuver it into place so that it slides in at an angle.
When aligned, place the motherboard over the stand offs.
Secure the Motherboard
Begin with the center screw to maintain the board in position.
Add the rest of screws in a star format.
Don’t over tighten, snug and firm should be good enough.
Connect Main Power Cables
Plug in the 24-pin motherboard power cable to the right of the board.
Plug in the 8-pin (or 4+4 pin) CPU power cable at the top left of the motherboard.
Step 8: Install the GPU
For gaming performance, the GPU is king. Install it properly for the most stable, and best cooling support & safety power delivery quality.
Prepare the PCIe Slot
It is usually 2 rear slot covers of most modern GPUs that need to be taken out from the case.
Ensure that nothing is plugged into the top PCIe x16 slot on the motherboard, the slot with the most bandwidth.
Insert the GPU
Align the GPU with the PCIe x16 slot.
Solid motion, and even click sound in the slot cliff.
The gold contacts should be entirely concealed in the cut.
Secure the GPU
Secure the GPU bracket to the case with the case screws.
This prevents sagging while the GPU is installed and also helps to ensure a good seat when your PC is being moved around for work or gaming.
Newer GPUS have different power plugs based on your wattage and architecture. Use the adapter/cable exactly for your GPU NO mixed adapters except it is unavoidable.
Common GPU Power Connector Types:
(1–2) 8-pin PCIe connectors: Used by the majority of mid-range to previous generation high-end GPU’s.
6+2 pin PCIe: Provides 6-pin and 8-pin power for regulatory flexibility.
NVIDIA 12-pin Founders Edition connector: Found on advanced high-gaming cards.
12VHPWR/ 12V-2×6 connector: The new PSU standard for RTX 40-series GPUs and beyond.
How to connect safely:
Make sure to plug in the connector completely, until it clicks, half-plugged cables can overheat.
In 12VHPWR, see that the cable is not folded sharply within 3-4 cm of the connector.
Use cables from the PSU directly, not splitters unless they are provided and recommended by your GPU maker.
Step 9: Install Additional Storage
If you’re going with 2.5” SSDs or 3.5” HDDs:
- Locate the drive bays
- Shove the drive in a tray or bracket
- Screw it securely
- Attach SATA Data to the Motherboard, and SATA Power from the PSU
Step 10: Final cable management and case fans
Organize Your Cables:
- Everything else Screw in extra Velcro straps, zip ties or cable clips to tidy all PSU, GPU, storage and peripheral cables.
- Pass cables through the apertures in your case to ensure your cables are out of the path of airflow.
- Better cable management also allows better cooling, less mess and upgrading in the future.
Connect Case Fans:
- Connect each case fan to your motherboard’s fan headers or a fan hub.
- Make sure to have correct airflow: fans pointing from bottom/front in, and those from top/back out.
- Do not leave fan wires near blades and airflow passages.
Connect Front Panel Ports:
Connect power switch, reset switch, HDD/LED indicators, USB plugs and audio plugs to the front motherboard headers.
Ensure that you follow the motherboard manual for pin arrangement and alignment very carefully.
Test all plugs to confirm the buttons, LEDs, usb ports and sound ports work.
Final Inspection:
Ensure there are no loose or pinched cables and that there aren’t any cables obstructing fan access.
Disconnect all power and data while the front panel is off.
First Boot, BIOS Setup, and Operating System Installation
There are few things in a custom PC build more satisfying than powering on your machine for the first time. Finally seeing your parts spring to life, RGB lights springing into existence and fans beginning to whirl is the reward for all those hours you’ve spent planning, building and triple-checking before flipping that power switch.
But before you go off and start installing games, there are some important things that need to be done in order to prepare your system for actual use: booting up for the first time, entering the BIOS, ensuring all of your components are being recognized, and installing an operating system.
The First Boot of Your Brand New Gaming Giant
All the gear is in and everything is hooked up, the build is finalised, so let’s get our first power on. The process can be nerve-racking for first-time builders, but it’s less daunting if you know what to expect.
What you want plugged in before first boot:
- Your powered PC.
- A keyboard.
- A mouse.
- A gaming monitor is plugged in to the GPU, not the motherboard.
- A USB drive with your OS installer on it.
When you have everything hooked up, flip the switch on the back of the PSU to “|.” Then hit the power button on the case.
Entering the BIOS (UEFI)
BIOS (or its more advanced successor, UEFI firmware) is a low-level setting that oversees how your computer communicates with its hardware. Before you install your operating system, it’s good to check that all your hardware is detected and configured properly.
How to enter BIOS:
Once the system has powered on, select the motherboard model’s splash screen as quickly as possible and continue to tapping at the BIOS button. This is usually:
- Delete
- F2
- F12
- Esc
If you missed the latter, your motherboard’s manual will tell you which key it is.
Verifying System Hardware in the BIOS
Once you have entered the BIOS interface, your first task will be to ensure everything you installed is being detected.
Look for these details:
CPU Recognition
The name of your CPU model should then appear on the main BIOS screen.
Memory (RAM)
BIOS should show:
- Correct amount of installed RAM
- Operating frequency on track
- If you’ve got dual-channel memory, make sure it is running in the dual-channel.
Storage Drives
Your SSDs or HDDs should now be listed under storage or NVMe/SATA settings.
CPU Temperature
In BIOS, a good idle temperature is usually from around 25C to 45C depending on the ambient room temperature and cooler being used. If you’re hitting temps above 80°C, power down and double-check your cooler installation.
Essential BIOS Configuration Before Installing OS
- Allow XMP/EXPO (AVX| for RAM Performance)
RAM is rated to run at speeds higher than the motherboard’s default, in most cases. To get full performance:
Search for XMP, EXPO, or DOCP depending on your motherboard/CPU manufacturer.
Activate the profile that corresponds to your RAM’s speed listed on its packaging.
- Set Boot Priority
Your motherboard has to have somewhere to look for a bootable device. Adjust the boot order such that:
- USB drive (with OS installer)
- NVMe or SSD (your next boot drive)
- Turn off Fast Boot (Option for New Builds)
Fast Boot is capable of bypassing hardware checks at times, and that’s something you don’t want to happen when building a new system. You can re-enable it later once all is settled.
- Flashing the BIOS (Optional but Recommended)
If you have BIOS flashback or in-BIOS updating capabilities:
- Make use of the “EZ Flash,” “M-Flash,” or one equivalent.
- Load the latest BIOS from a USB drive.
- The latest BIOS releases go for better stability, CPU compatibility, and memory frequency.
- Save and Exit the BIOS
- When everything looks good, select Save & Exit. Your PC should reboot automatically.
- If you’ve done it properly, your USB drive should now boot up your OS installer.
Preparing Your Operating System Installer
Most PC gamers run either Windows 10 or Windows 11, for the best game compatibility. You’re going to create your installation USB on another PC:
How to create a Windows installer? How to make an installer?
- Get the Microsoft Windows Media Creation Tool Official download.
- Run the tool and select “Create installation media.”
- Plug in a 8GB or larger USB key:
- Let the tool do its thing and format the drive, set up partitions and start copying OS files.
Avoid using third-party convenient tools if not required.
Operating System Installation
When the USB installer is detected, your system will boot into Installer interface.
Follow these prompts:
- Select your language, time format and keyboard layout.
- Select Install Now.
- Type in your Windows product key, or click I don’t have a key (if you’re using the ISO copy), you can activate it later.
- Select Custom: Install Windows only (advanced) – not Upgrade.
- Pick the main SSD (typically your NVMe drive).
- Click Next, if you are installing to a disk that is not yet formatted.
- Windows will now copy files and restart.
In modern SSDs, this whole procedure typically takes 10 to 20 minutes.
Completing Initial Setup
After Windows reboots into the setup program:
- Pick your region
- Choose your keyboard layout
- Connect to Wi-Fi or Ethernet
- Sign in or register for a Microsoft account
- Choose to sync settings or use a local profile
Choose privacy settings
Pass on OneDrive if you want to use local storage (recommended for gamers)
Once you complete those steps, Windows will configure your desktop.
Congrats, you now have a working OS on your PC!
Installing Drivers After OS Setup
It’s something that most beginners forget to do. If you don’t have the right drivers installed, your system is not going to be running well and your GPU will not be able to function at its full potential.
Install these drivers immediately:
- Motherboard Drivers
Download from your motherboard’s support page:
- Chipset drivers
- Network drivers
- Audio drivers
- SATA/NVMe drivers
- GPU Drivers
Visit your GPU maker’s as well:
- NVIDIA → GeForce Experience, or driver on its own
- AMD → Radeon Software
- Intel → Arc Control
These are the drivers to get if you want the best performance for new games, optimizations and stability.
Windows Updates and Security Settings
Run Windows Update (before gaming) to install:
- Security patches
- Additional hardware drivers
- A few optional updates for DirectX and. NET
This may prevent crashes or compatibility problems.
You Can Now Optimize & Install Games
Now that you’ve got Windows installed and drivers updated, it’s time to move on to the next stage.
In next section, we’ll focus on how to tweak your gaming PC to ensure that speed, cooling and stability are all rock-solid.
Post-Build Optimization, Performance Tuning, and Maintenance
It’s only when you’ve built your gaming PC that the fun really begins. When the assembly is complete and the operating system is installed, you enter a new stage of customization.
This continued care means you will always get the best performance, and all of the continued smooth gameplay that you expect from Epic’s games and your PC hardware.
This section discusses several almost-mandatory tasks for you to do after your build, as well as helps ensure that your rig stays clean, updated and future-proof.
Install and Update System Drivers
Your PC might work with Windows’ generic drivers, but those are bloat for what you don’t need. To get the most performance possible, especially from your GPU you also must install drivers from the manufacturer.
Key drivers for the installation and updating:
Graphics Drivers:
Download and install drivers straight from NVIDIA, AMD, or Intel, never via Windows Update or display drivers provided by your PC manufacturer.
GPU drivers also offer game-specific optimizations, which may increase your frame rate and eliminate stuttering as well.
Chipset Drivers:
Try installing the chipset package from your motherboard manufacturer’s site. These drivers are what help the system interface correctly with the CPU, USB ports, PCIe lanes and so on.
Network Drivers:
You can download Ethernet and Wifi drivers that you need to access the devices available on your computer.
Audio Drivers:
These enhance sound and microphone quality, access to features such as spatial audio or noise cancelation.
Customize Your Display and Monitor Settings
Your monitor matters more in gaming than your PC’s hardware. After installing GPU drivers:
- Ensure that your monitor is set to its native resolution.
- Make sure the highest refresh rate available (144Hz, 165Hz or 240Hz+) is chosen.
- Turn on adaptive sync such as g-sync or freesync, if supported.
One of the most prevalent early issues made among new builders is setting up their displays incorrectly. A 165Hz monitor fixed at 60Hz won’t display its full fluidity no matter what kind of frame rates your PC spits out.
Optimize In-Game Settings
Each Gamer pushes the priorities of those factors-performance, visual quality or a combination. When everything is perfectly aligned, drivers and display configuration wise:
- Custom tailored settings with built in, dedicated memory for the integrated graphics card.
- Set texture quality, shadow detail, anti-aliasing and post-processing to levels that align with your desired FPS target.
- Use upscaling technologies like DLSS (NVIDIA), FSR (AMD) or XeSS (Intel) to give a performance boost in higher resolutions.
It’s generally worth a shot to play a game for, say, 20–30 minutes and then adjust things until you get the best performance-to-quality mix.
Enable XMP/EXPO Profile on High-Speed Ram
This is a step that many builders miss: If you’re using high-speed RAM, it won’t run at its full performance by default.
Go into the BIOS and enable:
- XMP (Intel motherboards)
- EXPO (AMD motherboards)
This enables your computer’s advertised memory speed to be utilized for an incredible increase in system performance, when paired with a compatible memory kit.
Manage Startup Programs
A new Windows installation is lean, but over time, some of the apps you install and reviews can start when your computer does and run in the background.
You can clean this up by doing the following:
Task Manager → Startup Apps
Turn off anything you don’t use at boot, launchers, updaters and cloud apps are the usual suspects.
This helps to keep your system running smoothly and save resources having to run continuously in the background.
Monitor Temperatures and System Health
Long life, Low noise, and Gaming Stability Thermal performance impacts the longevity of your system noise levels. After building your PC:
- You can monitor temperatures with HW Monitor, MSI Afterburner, HW iNFO or Open Hardware Monitor.
- Do a light run of GPU and CPU, to ensure the thermals are stable.
Ideal temperature ranges:
CPU: 30 – 45 C at rest, 70 – 85 at load
GPU: idle 30-50C gaming loads -70-85c (ish)
If temperatures are higher:
- Reroute cables for better airflow
- Add or reposition case fans
- Reseat your CPU cooler
- Reapply thermal paste if not applied correctly
You need to keep tabs on temperature if you want to prevent thermal throttling, which slows down components to manage heat.
Clean Up Windows for More Gaming Performance
Windows can be a great OS to boot for gaming, but a little tweaking will let you game without any drag:
- Turn on Game Mode.
- Disable notifications during gameplay.
- Limit background apps: Go to Settings → Apps → Startup.
- Disable unwanted visual effects in System → Advanced Settings → Performance.
These actions can help eliminate interruptions and release resources.
Keep Your System Physically Clean
You must have heard that dust is the silent killer of PCs. It obstructs air flow, blocks fans and increases temperatures.
Routine maintenance schedule:
Every 1–2 months:
Superficial vacuuming of vents and outside grills.
Every 4–6 months:
Open the cover and clean fans, heat sinks, and filters by blowing compressed air over them.
Every 12 months:
Give your PC a good cleaning; it’s also a time to look into applying fresh thermal paste if you’re experiencing temperature creeping.
Pro tip:
No vacuum cleaners on the inside, static electricity is your enemy! Always use compressed air (in short blasts).
Back Up Your Data Regularly
Now that your system is running like a charm, it’s time to protect your important files. Use:
- An external HDD/SSD
- Cloud storage services
- Built-in Windows Backup tools
Make regular backups so you never have to lose save files, games or creative projects if a drive ever stops working.
Stay Up-to-Date with Your BIOS and Firmware
Updating your BIOS might sound intimidating, but make no mistake: it’s a straightforward process.
Why update BIOS?
- Improved CPU stability
- Better RAM compatibility
- Performance enhancements
- Bug fixes
- New hardware support
Just make sure you read your motherboard’s manual before performing the update and do not let it lose power during the process.
Plan Long-Term Upgrades
A custom PC grows with you. When new titles are added or performance requirements increase:
Add more RAM
Install a higher-capacity SSD
Note: The GPU is TSMC 7nm Process Technology which is compatible with very newest next gens of games!
A finely tuned PC isn’t just faster; it’s a more pleasant and durable machine that keeps right on trucking when compared to those big-box machines from HP or Dell. Just when you are ready to fire-up your gaming beast, don’t forget to connect your advanced gaming consoles for an uninterrupted experience.
Final Thoughts
Constructing a gaming PC is about so much more than following instructions or popping in some pieces like those digital LEGO blocks we’re all familiar with. It’s an adventure. one that can help you understand how your hardware actually works, expose you to the dark world of performance tuning, and put you in control of every aspect of your personal gaming System. Possibly for the first time, or at least along the way of your long tech journey, and this is a milestone to celebrate.
From picking our parts to fitting our CPU, seating our GPU, plugging in our power cables, formatting hard drives, configuring BIOS settings, and tuning for clean lines of airflow, every individual step gets us a little closer to a powerful machine we need.
Yes, the Build Is Finished, but the Ride Isn’t!
One of the coolest things about PC gaming is your system can grow with you. New games just coming out can challenge the best PCs on the market. And as new gaming breakthroughs arrive, your computer will be able to keep up. You can always drop in a new GPU when you want more frames at higher resolutions. You can exchange your cooler and run at lower temps, or if you prefer a quieter setup. You can expand your storage as your game collection increases. Each upgrade is an opportunity to learn, iterate and improve.
So go ahead, fire up your favorite game, crank it to ultra settings, let the high-res textures paint a true tableau of color on your monitor; not even breaking a sweat.